Introduction to Timing Your Cannabis Harvest
Harvesting cannabis at the precise moment maximizes cannabinoid and terpene content, directly influencing potency, flavor, and effects. Home growers often rush or delay this step, leading to diminished quality or lost yields. This guide focuses on visual cues from trichomes and pistils while covering post-harvest techniques for drying, curing, and storage. By understanding these processes, you can plan successful grow cycles tailored to specific strains.
Peak maturity occurs when THC levels crest before degrading into CBN, which reduces psychoactivity. Environmental factors like light cycles, nutrients, and genetics influence the timeline, typically 8-12 weeks into flowering for most photoperiod plants. Autoflowers follow a shorter, fixed schedule but still benefit from the same inspection methods. Proper timing combined with careful handling ensures terpenes remain volatile and potent. For example, maintaining consistent 12/12 light cycles during flowering helps stabilize the maturation window, while excess nitrogen late in bloom can delay pistil color changes by several days.
Interpreting Trichomes and Pistils for Peak Windows
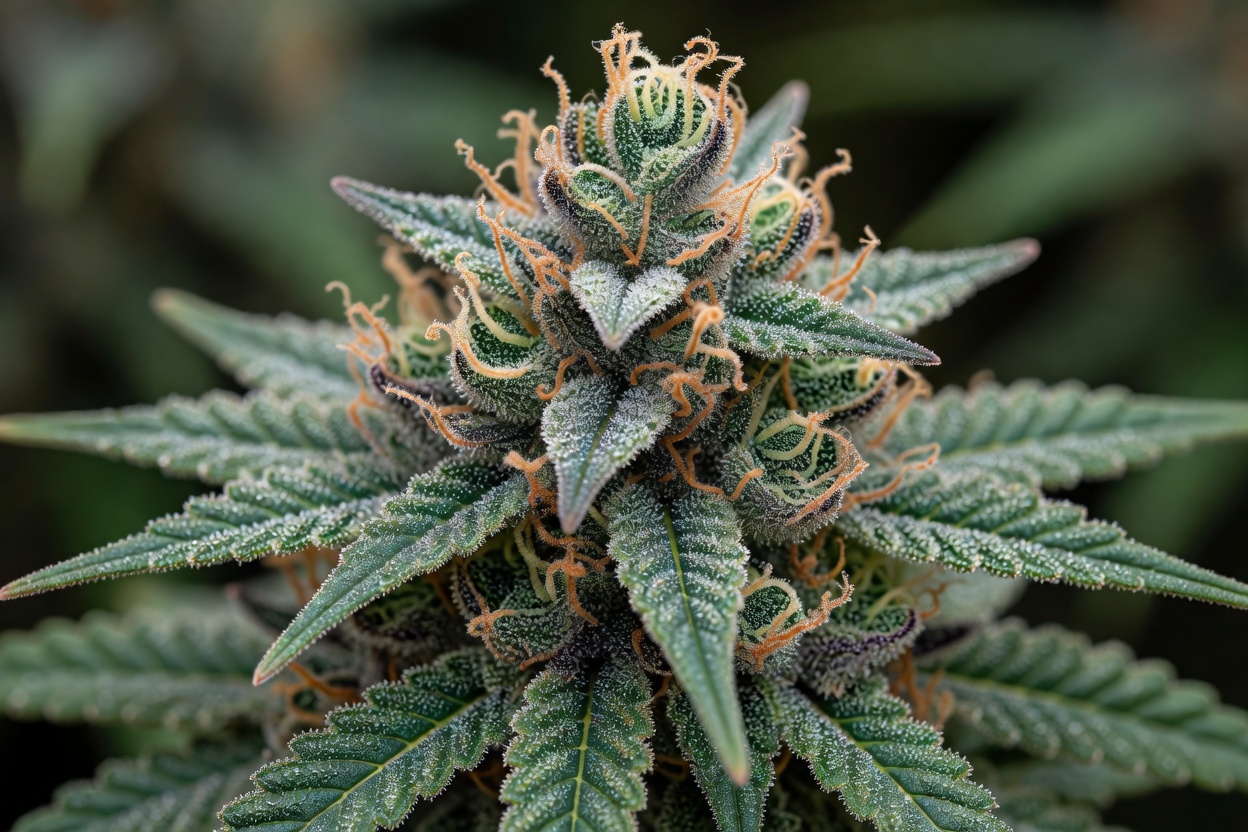
Trichomes are the resin glands covering buds and leaves, appearing as tiny mushroom-shaped structures. Use a jeweler’s loupe or digital microscope at 30-60x magnification to observe color shifts. Clear trichomes indicate immaturity and lower potency. Milky white signals peak THC production, ideal for energetic effects. Amber trichomes denote oxidation into CBN, suiting sedative strains but risking potency loss if over 20-30%.
Using Magnification Tools Effectively
Choose a loupe with built-in LED lighting for indoor grows where shadows obscure details. Examine buds at eye level by gently bending branches rather than removing material. Check at least five sites per plant, including lower popcorn buds that often lag behind top colas by three to five days. A practical example involves logging observations daily starting week seven; many growers notice the shift from clear to milky occurs over 48-72 hours under optimal 68-75°F conditions.
Monitoring Pistil Changes
Pistils provide complementary visual signals. Initially white and upright, they curl and darken to orange or brown as flowers mature. When 70-90% have changed color and trichomes are mostly milky, harvest is imminent for most hybrids. This dual inspection prevents premature cutting that leaves underdeveloped cannabinoids. Always check multiple bud sites, as top colas mature faster than lower branches. If pistils on side branches remain white while tops show 85% browning, wait an additional four to seven days before cutting.
Strain-Specific Advice for Planning Cycles
Indica-dominant varieties like Northern Lights often finish in 8-9 weeks, with harvest triggered by rapid pistil browning and 10-20% amber trichomes for body-focused effects. Sativas such as Sour Diesel require 10-12 weeks, rewarding patience with extended milky trichome phases that deliver uplifting highs. Hybrids like Blue Dream balance both, typically harvested at 9-10 weeks when 80% pistils darken.
Tracking Phenotypic Variations
Autoflowering strains including White Widow Auto demand attention around week 8-10 from sprout, independent of light schedules. Growers should track individual phenotypes because even within the same seed pack, slight genetic variations alter windows by several days. Keep a simple notebook noting first pistil appearance and trichome color percentages at weekly intervals. Planning multiple staggered cycles allows continuous learning and refined timing based on observed results, such as adjusting nutrient schedules to speed up or slow maturation by a few days.
Setting Up Effective Drying Rooms
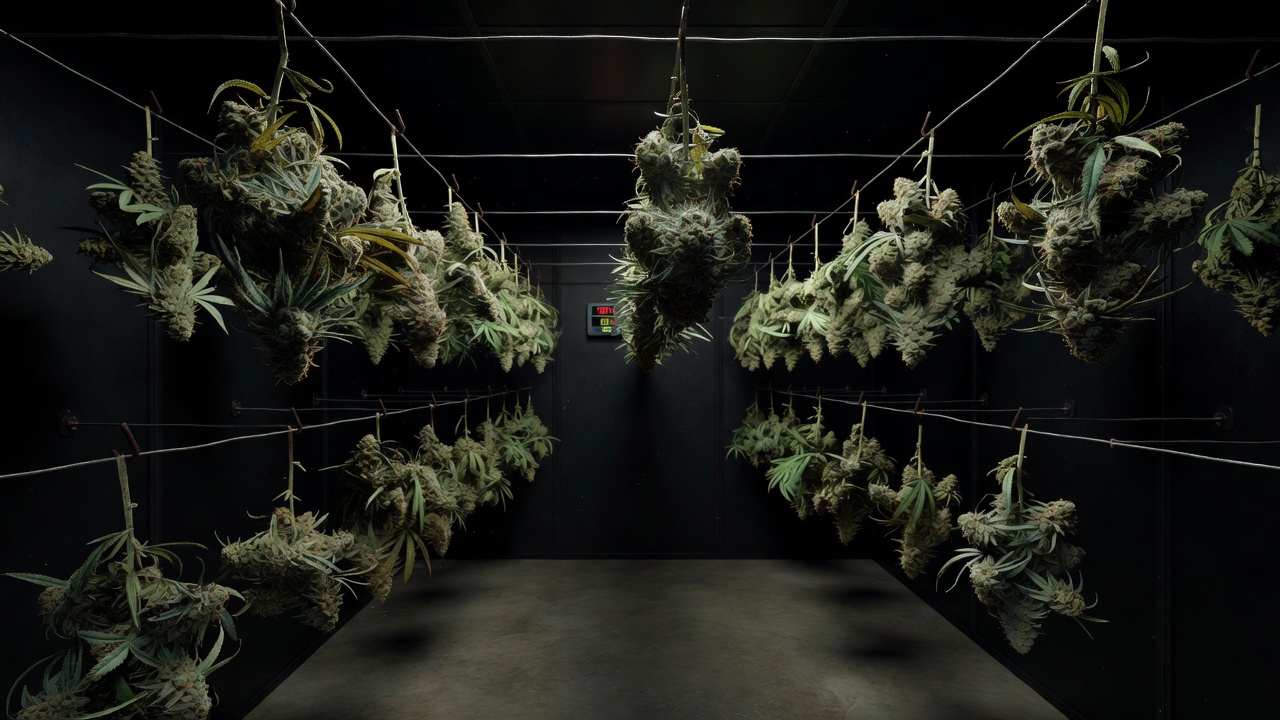
After harvest, immediate drying prevents mold while beginning chlorophyll breakdown. Aim for a dark room maintained at 60-70°F (15-21°C) with 45-55% relative humidity and gentle airflow from oscillating fans. Hang whole plants or large branches upside down on lines, ensuring buds do not touch to promote even moisture evaporation over 7-14 days.
Daily Monitoring and Adjustments
Monitor daily with a hygrometer; stems should snap cleanly rather than bend when ready. Overly rapid drying locks in harsh chlorophyll flavors, while slow drying in high humidity invites bud rot. This stage sets the foundation for potent, smooth smoke and prepares flowers for curing without excess moisture. Place a small fan on low speed two feet away from hanging branches and rotate plants every other day for uniform results. In humid climates, add a dehumidifier to keep RH below 55% and prevent the dreaded ammonia smell from anaerobic bacterial activity.
Jar Curing Techniques to Retain Terpenes
Curing in airtight glass jars refines flavor and stabilizes cannabinoids through controlled moisture release. Fill jars loosely to two-thirds capacity, burp daily for the first week by opening 10-15 minutes, then reduce to weekly. Target internal humidity of 58-62% using two-way packs if needed. This anaerobic environment converts remaining sugars and enhances terpene profiles over 2-8 weeks.
Burping Schedules and Humidity Control
Avoid plastic or metal containers that can impart off-flavors or static. Temperature stability around 65°F prevents terpene evaporation. Many growers notice significant aroma improvement by week three, confirming the process’s value for maximizing perceived potency and smoothness. A concrete tip is to label each jar with harvest date and strain, then smell-test during burps; if hay-like odors persist past week two, extend burping sessions by five minutes daily until the scent turns earthy or fruity.
Long-Term Storage Methods to Avoid Mold
Once cured, transfer buds to vacuum-sealed or humidity-controlled containers stored in cool, dark places below 70°F. Avoid frequent opening and light exposure, which degrade THC into CBN and evaporate terpenes. For extended periods exceeding three months, refrigeration in sealed jars maintains quality, though freezing risks trichome damage upon thawing.
Preventing Degradation Over Time
Regular checks for mold or ammonia smells allow early intervention. Research from NCBI highlights how proper post-harvest handling preserves cannabinoid stability. Additional guidance is available from University of Minnesota Extension resources on harvest practices. These steps ensure your harvest retains maximum value through the next grow cycle. Store jars in opaque boxes and open only under red-spectrum light to minimize UV exposure that accelerates breakdown.
Conclusion
Successful cannabis cultivation culminates in precise harvest timing via trichomes and pistils, followed by meticulous drying, curing, and storage. Applying strain-specific insights allows home growers to consistently achieve high-potency results while protecting delicate terpenes from degradation or contamination. With practice, these methods transform good harvests into exceptional ones.